Practical MySQL Replication and Scalability - Part 4: Scale-Out with Clone and Chain Replication
Part 4 closes the series by moving from replication setup into scale-out operations.
Once GTID-based replication is stable, the next question is usually how to add capacity without repeatedly taking full manual backups from the primary source. MySQL’s clone plugin gives you a faster bootstrap path, and chained replication helps distribute replication load more flexibly.
The Scale-Out Pattern
In the example topology, mysql-a already replicates to mysql-b. Instead of building mysql-c directly from mysql-a, you can clone from mysql-b and then configure mysql-c to replicate downstream.
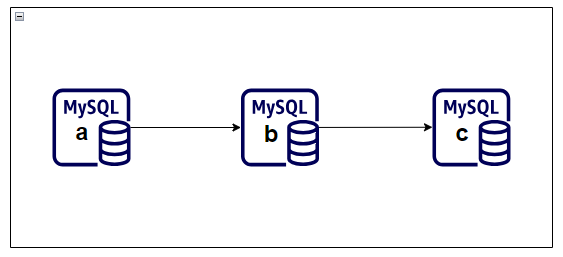
That creates a chain topology:
mysql-a -> mysql-b -> mysql-c
This can reduce operational pressure on the original source and give you more options for replica placement.
Step 1: Install the Clone Plugin
Install the plugin on both the donor and the receiving replica.
INSTALL PLUGIN clone SONAME 'mysql_clone.so';

SELECT plugin_name, plugin_status
FROM information_schema.plugins
WHERE plugin_name = 'clone';
You want the plugin status to return ACTIVE.
Step 2: Create a Donor Account
Create a dedicated user for clone operations rather than reusing the replication account.
Example pattern:
CREATE USER 'donor_clone_user'@'mysql-c' IDENTIFIED BY '<strong-password>';
GRANT ALL PRIVILEGES ON *.* TO 'donor_clone_user'@'mysql-c';
In a production environment, you would likely narrow both privileges and host scope more aggressively than a lab example.
Step 3: Define the Valid Donor List
On the receiving server, tell MySQL which donor host is allowed.
SET GLOBAL clone_valid_donor_list='mysql-b:3306';
SHOW VARIABLES LIKE '%clone_valid%';
This prevents arbitrary clone sources from being used accidentally.
Step 4: Run the Clone Operation
Now clone the donor instance onto the new replica.
CLONE INSTANCE FROM 'donor_clone_user'@'mysql-b':3306 IDENTIFIED BY '<strong-password>';
The clone operation replaces existing user-created objects on the target and restarts MySQL as part of the workflow. Treat it as a provisioning action, not a casual maintenance command.
Step 5: Reattach Replication
If GTID-based replication is already enabled, you can connect the cloned server to its upstream source without manually supplying binary log coordinates.
Example:
CHANGE REPLICATION SOURCE TO
  SOURCE_HOST='mysql-b',
  SOURCE_PORT=3306,
  SOURCE_USER='replication_user',
  SOURCE_PASSWORD='<strong-password>',
  SOURCE_AUTO_POSITION=1,
  GET_SOURCE_PUBLIC_KEY=1;

START REPLICA;
SHOW REPLICA STATUS\G
This is where GTID pays off again. The new replica can align based on executed transactions instead of a manually captured file position.
Step 6: Validate the Chain Topology
To prove the scale-out path works, create a new object on mysql-a and verify that it appears on both downstream servers.
Example:
CREATE DATABASE db8;
Then verify on mysql-b and mysql-c:
SHOW DATABASES;
If db8 appears on both servers and the replica status remains healthy, the chained flow is working as expected.
Operational Notes
This pattern improves scalability, but it does not automatically solve failover orchestration, write conflict management, or split-brain prevention. Those concerns belong to a fuller high-availability design using tools such as InnoDB Cluster and related topologies.
Still, for read scaling and faster replica provisioning, clone plus GTID-based chained replication is a practical and effective pattern.
This closes this replication series. The next natural step is to move from replication and scale-out into the higher-level MySQL HA patterns built on top of them.